Showing posts with label Original. Show all posts

Friday, March 13, 2015

Elcie and the Hippocampus

Hey everyone, here are a couple of motifs I've finished.

Done in Lizbeth size 20, #618 and #644 . Motif #4 of my second challenge.


This motif pattern is Elcie by Wanda Salmans. It was an easy pattern to follow, and I like how it looks in these colors.

Done in Lizbeth size 20, #647 , #686 , and #688 . Motif #5 of my second challenge.


This Hippocampus pattern is another one of the things I've been working on recently. I love mythical creatures, and am always looking for new tatting patterns featuring them. When I can't find a pattern, I think about trying to make one up myself.
I like how the hippocampus turned out, though the tail took a couple of drafts to get right.
Thus far, I've been focusing on making up patterns for mythical creatures that are hybrids.
What kind of patterns do you like?
For those of you who design patterns, what kind of process do you go through when making a new pattern?

Wednesday, November 12, 2014

The dragon of excess rises

I have another excess thread project to share today. Done in size 10, I started with this critter's legs and went on from there.

Basking her wings in the sunlight, Dragonthing fears nothing.

Standing about four inches tall at her snout, this dragon... thing has a wingspan of seven inches from wingtip to wingtip.

Despite having six horns and a keen sense of smell, Dragonthing secretly wishes she had eyes.

After making the legs, I began the body at the tail and worked my way up to the neck. Then I made the head and attached it. After that I made the framework for the wings, and lastly the membrane.

Dragonthing loves all the colors in her wings, and rides through the air like a kite.

I tried two different patterns for attaching the split ring wing membrane to the wing frame. With the wing on the left, I connected the split rings until reaching the elbow joint, then doubled back and forth until reaching the base of the frame, and then took each row in a straight line.
With the wing on the right, I took the split rings to the base of the frame on the first row, and had straight rows through the entire work.
Both methods work, though the first method is more time consuming.

Shifting her wings, Dragonthing hears the howling wind.

From the tip of the wing membrane to her head, Dragonthing is about eight inches long.
After I finished tatting the wing membrane, I attached it along her body by sewing. That way, I was able to position it exactly as I wanted.

I enjoy making excess thread projects. They are an opportunity to tat whatever I might feel inclined to make, while using up thread from other projects in a way that I don't need to worry as much about hiding the ends or running out of thread in the middle of the project ... okay, I still have to hide the ends in split rings when changing colors, but split rings are probably my favorite tatting technique. So they don't count as much.

Well, I hope you liked Dragonthing, the vaguely dragon-like creature made from excess thread.

Good luck with your own projects!

Wednesday, March 19, 2014

Charming motifs

Today I have two pieces to show you.

Done in size 10. Motif #3. Done in a light blue and a mint green.

This pattern is from Tatting Patterns, by Julia E. Sanders. Called figure 13, this trimming was interesting to tat because the picture was not on the same page as the pattern. I like these two colors together, and the pattern was fun. In the picture, it looked like most of the chains were facing the same way, so that's what I tried to do.
Weaving in the ends was interesting. I'm slowly figuring out what works best for me with hiding the ends.

Done in size 20, size 80, and sewing thread. Motif #4.

This is one of those uncommon pieces that I set out to make for myself. It started off when I decided to tat Marilee Rockley's Compass Pendant (bottom center, done in Lizbeth size 20, #684 and #694), from her Tatted Jewelry book. After I made it, I thought to myself, what would you like to do with this? How about a charm bracelet!
So I grabbed some thread, and tatted a doodle that looks a little like an anchor (top right, done in Lizbeth size 20, #647).
After that, I decided that the bracelet needed a hat. Because I love hats. I haven't posted very many of them, but usually when I pick up a shuttle and begin tatting without a particular pattern in mind, I end up making either butterflies or hats. (Bottom right, done in Lizbeth size 20, #115).
Then, because I like video games, I decided to tat a pokeball and the Triforce (from Pokemon and the Legend of Zelda, respectively). For the Triforce, I used a cloverleaf from a motif in The Complete Book of Tatting, by Rebecca Jones. The pokeball was another doodle I made up. (Triforce: bottom left, done in gold sewing thread. Pokeball: left, done in Lizbeth size 80, #671 and #601).
The last charm is a key. Because I collect keys, and think that keys are cool. I just made it up as I went. The blade of the key ended up looking kind of like a R, which is kind of neat. (Right, done in Lizbeth size 20, #691).
I weaved in the ends with each charm, which was interesting. I had to change to a smaller needle for the pokeball and Triforce.
The chain that the charms are on was from my jewelry making supplies, along with the clasp. So it is just the right fit for my wrist!

Monday, February 17, 2014

Lovely gifts

Well, I have a bunch of pieces to show you today.
The first is a bookmark I made for my friend's birthday.

Done in Lizbeth size 20, #657 and #603.

The pattern is an edging from A Tatter's Workbook by A. Tatter. I added two extra chains for the top and bottom, repeated the edging to make the second side, and joined the small chains in the center to hold it all together.
My friend liked it.

Next are some Valentine's day gifts that I tatted.

Done in size 10. My adorableness is unbearable!

This cute bear came from the book Tatted Animals by Inga Madsen. It was fun because it was my first real attempt at a diagram only pattern. I'm eager to tat some of the other critters from this book!

Done in size 10. Haven't you heard of a purple dolphin?

I've been meaning to tat Jane Eborall's Dolphin for for my sister ever since I first came across it. But the pattern ended up sitting in a folder for a couple of years.
But that ended up being a bit of a good thing, since this pattern had a technique in it that I wouldn't have really known how to do a couple of years ago.
Namely, split chains.
Now, I love split rings. Love them. But until very recently, split chains were terrifying.
I don't quite know why, but they were.
But I was determined to do the two split chains in this pattern.
And I did!
Another thing I learned from this pattern was down picots. What are down picots? A picot that faces down! They are really easy to do, and pretty cool. I like down picots.

Done in size 10. That's quite a hearty red, isn't it?


My tension was a bit off with this heart. The pattern is Heart Frame, from Tatting Hearts by Teri Dusenbury. I don't really have much to say about this piece, other then it was the only heart I tatted for Valentine's day.

Done in size 10. Don't we look cute?

If these look familiar, that's because they are. When I was tatting the bear from Tatted Animals, part of the belly piece looked a lot like a flower. So I decided to tat some as flowers. I like the overlapping picots.

Done in size 10. Still a little rough around the feathers...

This is a griffin. A tatted griffin. I looked all around the internet for a griffin tatting pattern, but couldn't fine one.
So, I decided to try and make one.
It took a few revisions, but I've gotten most of the kinks worked out. The hindquarter is almost entirely made of split rings, while the forequarter is a combination of rings, chains, split chains, split rings, and one thrown ring. With some josephine knots and down picots thrown in for fun.
It was a lot of fun coming up with my own pattern, though there are a few things that still need some tweaking.

As I was working on the griffin, I decided that I want to participate in the 25 Motif Challenge. This means that I'll be trying to tat twenty-five motifs within a year. Am I up to the challenge? I'm going to try!
So to start off the challenge, this griffin will be my first motif!

25 Motif Challenge status: 1/25.

Wednesday, January 8, 2014

Float among the clouds

Well, I've finished another excess thread project.
This one is pretty cool, and used up most of my excess size ten thread.

See that basket? It was going to be a ring box.

The balloon was made with a single ring and a bunch of chains. I stuffed it with some stuffing so that it would maintain its shape.

The seam color of the balloon changes five times. It was also excess thread. 

I used some clear plastic cord to connect the basket to the balloon. That way from a distance the basket would appear to be floating under the balloon.

The balloon is really soft and fun to squeeze.
The order of the thread color is based on when I tied it to my excess thread ball. The thread at the bottom of the balloon is younger then that at the top, while the thread used on the basket is the youngest.
What's really neat is how the hot air balloon's shadow really does look like a hot air balloon.

Well, I hope you enjoyed this post. Good luck on your own projects!

Friday, October 4, 2013

No! Don't set your drink there!

Crocheting strikes again!

The ring of moisture shall consume all!

This was an experiment in keeping my rows equal. Then it became practice for a new (to me) crocheting technique, which I do not know the proper name of.
Crocheting is confusing. And annoyingly difficult.
But it gives me something to do when my fingers grow tired of whatever tatting project they've been doing.
So here is a little crocheted coaster, gently used.

Thursday, October 3, 2013

Belated birthday post

Well, at least this is only belated in posting, not in actually giving it the person.
This was meant to be posted way back in July, but I kept forgetting about it.
But no more!
Behold, the combined powers of crocheting and tatting!


It reminds me of the ocean. If the ocean was a cute little basket. And not, you know, wet.


I know. The tatting is just a simple edging along the top of the basket. But that crocheting was made by me! Without the use of a pattern! I was pretty excited about this.

Look! You can see through it! A little bit...


I might not like crocheting as much as tatting, but it does have its moments.

Look into the depths of the yarn. What do you see?


My tension with crocheting has been described as "really tight." But I think this turned out pretty well.

I could be a jellyfish, if my tatting was longer...


Through it may have been delayed, here is the crocheted basket with a tatted edging.

The path through a book is long. Remember to bring a friend.

And to finish this post off, here is the other part of her present. A tatted bookmark!
You didn't think that crocheting was going to be the star of this post, did you?

Thursday, August 29, 2013

Can you pass me another birthday?

Today is my cousin's birthday! To help him celebrate, I tatted him a soda can cozy.

Split rings! Done in size 10.

It fits snugly onto a normal size soda can, and should help to keep the drink cold.


I did it in a dark red and dark blue, so that any spills shouldn't be as noticeable.


Depending on which way he put's it on, it can appear more red then blue when looking from an angle, or the opposite.
Done in all split rings, except for the first and last ring, which are normal rings.
Each ring is 3-3-3-3 or 3-3/3-3, with joins thrown in where appropriate.

Tuesday, August 6, 2013

Progress report

I haven't posted in over a month, so I thought it might be a good idea to show you some of the projects I'm currently working on.

Crocheting! How dare it be so difficult?


First off, a large chunk of my tatting time has been taken by crocheting. In April, I asked my sister to teach me how to crochet. She agreed, so now I know some basics.
But it is so frustrating! I'm not very good at making the stitches loose, since my fingers tend to hold the yarn as if I were tatting. With more practice, I'm sure that I'll be able to make a loose, fancy piece of crocheting.
The above picture is a little hat I crocheted.

Ah, split rings, how I enjoy making you. Winifred and Sunny the shuttles say hello.


Now tatting is so much easier for me then crocheting. My favorite technique would have to be split rings, which is what this project is going to be made mainly of! Using leftover thread from other projects, I'm making a little tatted box to hold a couple rings in. Leaning against Sunny the shuttle is the completed lid of the box, while below is one of the unfinished pieces. The box will have five pieces like that unfinished one: each being made of six rows of six rings, the rings themselves being a pattern of 3-3-3-3 (the 3's being the number of double stitches and the - being a picot, though after the first row some picots will become joins).

Carl and Pandora the shuttles have been hard at work. 925 rings to be exact.


Here is something I've been working on for a while. This is the first half of a tatted bag I'm making. As the tape measure shows, it will be just a little over fifteen inches wide. Each row has sixty rings (3-3-3-3), and I'm on row sixteen. The current plan is to have sixty rows. After it is done, I will tat an identical piece and connect them with a tatted insert also made of split rings. Its a good thing I like split rings, right?

Here is a hint at what has been eating a majority of my tatting time.


Now for this last picture, I'm not going to show you the entire project. Because it is not even close to done! This thing is ridiculously large for my meager crocheting experience, but I'm determined to finished it. This picture does show you how tight my crocheting is though. When I finish the crocheting, I plan on tatting an edging to complete this project.

Well, that's the end of this progress report! I hope all of your works in progress are going well!

Thursday, June 6, 2013

Shrimp doodle

Time for another birthday!
Today is my father's birthday. It took a bit of time for me to figure out what I was going to make him. Then I remembered that he likes eating shrimp.

Done in size 10. The colors are white, pink, and red.


I couldn't find a pattern for a shrimp in my tatting books or online, so I experimented. It is a simple doodle, attached to a card that reads, "Happy birthday! Here is a little shrimp for your lunch."
My father got a laugh out of it.
I think if I try tatting a shrimp again, I'll make it more detailed.

Tuesday, June 4, 2013

Need a spare?

Today is my cousin's birthday!
I had some trouble deciding on what to make him. I'm not always sure that my male relatives would like a gift of tatting. You see, the ones that live near me are very outdoorsy. Not really the kind of guys who would like a frilly piece of lace.
So it took a while before I got the idea of tatting my cousin a tire.

The stitches are difficult to see due to the black thread. Done in size 10.


My cousin likes his car. So I tatted him a little spare tire to put with his keys. I made up the pattern myself, and used both the double stitches and some josephine knots in order to give the tire some texture. The rim gave me the most difficulty.
But in the end, it turned out well. My cousin seemed to like it when I gave it to him last night, so I would call this one a success.
Now to go tat four more so I can make a tatted car...

Wednesday, April 24, 2013

The snowman

Once there was a snowman, made from thread.
He had a red scarf and fancy hat.
Now this snowman was as curious as could be.
For he was made from tatting, you see!

I don't melt in the summer!

He's just a little guy, but I was happy with how he turned out. This snowman was part of the Christmas tatting I did for various family members last year.
I like tatting three dimensional things. They always look so interesting when they are complete. I think a three dimensional dragon would be really cool to tat.
What kinds of crafts do you like doing? Do you like to make your own patterns?

Friday, April 5, 2013

A basket for my cousin

I really like split rings. They are a technique used in tatting that allows you to close a ring in any direction by using two shuttles. The split ring was one of the techniques I needed to learn in order to tat the Minor Norwegian Dragons pattern. I really like that pattern, but that's not what today's post is about. So last year for a cousin's birthday, I decided that I wanted to tat him something. But I wasn't sure what to make him. I wanted it to be something that he could use, not just a frilly piece that he would look at and hesitantly thank me for while thinking thoughts like: What do I do with this girly thing? Is this suppose to look like a bear, or an elephant?
Well, I had tatted myself a little pocket out of two sheets of split rings that was useful keeping things together in a bag or on a table, and it gave me an idea for a split ring basket. I thought that a basket, if I made it big enough, could be placed on a table and hold his keys, watch, or other objects.
I went with the idea, deciding that I had enough time to make it large enough.


Done in size 10 thread, left unstiffened so that the sides can stretch to hold things.

I was very happy with how it turned out. The variegated thread made it possible to see what way the pattern went, and the size worked for what I wanted.

I'm not slouching, doc!
Okay... Maybe I have put on a few pounds...


I was a fun piece. I tatted the bottom first. After I had that sheet the size I wanted, I began working on the sides. For the sides, I just went around and around, joining each ring to the one below it. When I reached the beginning, I just joined the ring to the one below and beside, that way the next row would begin above the previous one.
The entire piece was made with split rings, excluding the beginning and ending rings of the bottom and the sides. Those were just normal rings.
I've noticed that some tatters out there don't really like split rings. But if you give them a chance and experiment a little, they are a very useful and fun technique.

Wednesday, April 3, 2013

The ivory butterfly

I meant to post about this back in March, but didn't get around to it until now.
Ever since I learned to tat, I've tried to tat something whenever a family member has a birthday. I haven't succeeded with every birthday, for a number of reasons ranging from not knowing what to tat them to the stealthy sneakiness of birthdays. I've sat down to read a book or tat a excess thread project, only to have someone remind me that a birthday is that weekend.
If birthdays were people, they would belong to an elite clan of ninjas.
Birthday ninjas.
Moving on, I was able to tat something for my sister's birthday.


Lizbeth size 20, Mocha Swirl

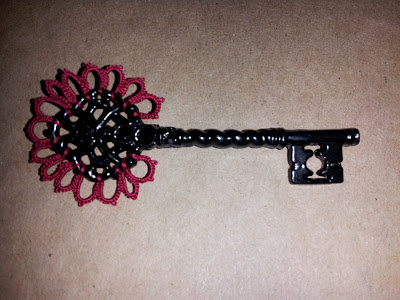
"I tend to experiment with birthday presents. Like the key, this was a pendant I picked out because it way cool and looked like it would easily accept tatting. I wanted to keep the tatting simple for this piece, something that would shout for attention. That's why I chose this variegated color and stuck with chains, with the exception of that one brown ring at the very bottom of the pendant.
This is the second piece that I've added tatting to. I think I'll try using more rings in the next piece. Maybe have multiple rows of tatting.
Anyway, I've rambled enough for one post. Expect another post on Friday!

Monday, March 18, 2013

While at the dentist

I went to the dentist today. While I was in the waiting area, I was able to complete a tatting project.

Being numbed by the dentist does not mean that you can't tat.


This little coin purse is a birthday present for a cousin. I love making things out of tatting for my relatives birthdays, and thus far they seem to like what I've made. Making something for someone else is a wonderful way to show them you care.  Even if it isn't their birthday, you can still surprise them with a little handmade gift.

Don't be afraid to test the gift first. It's better to test it and fix any flaws before you give it away.    


So next time you have a dentist or doctor's appointment, why not try taking a craft with you to work on?

Friday, March 8, 2013

Trying size 80

I normally tat using size 10 crochet thread, as that is what I can easily find in my area. I have a fair collection of Lizbeth size 20 that I like to use for special projects, but until December I hadn't been able to get any size 80 thread.
For those who may be wondering when I talk about thread size, the higher the number is, the smaller the thread. Size 80 is one of the traditional thread sizes when it comes to tatting and makes the finished piece look daintier.
 Anyway, I tatted using size 80 thread for the first time a few days ago.

Lizbeth size 80: Victorian Red


It was just a simple pattern of chains joined to a key broach, but I quite enjoyed the experience. Size 80 is much finer then the size ten I normally use, but it was really fun to tat with. I'm eager to think of another pattern that I can tat with size 80.
Don't be afraid to try something new!

Tuesday, March 5, 2013

Tatted amigurumi

What is amigurumi?
Well, it is Japanese for "knitted or crocheted stuffed doll." Wikipedia has an article about it that talks about the technique and purpose, so if you're interested in making something like this, feel free to study up on it. Now, you may be wondering why I began this post with talk of a art that is made through knitting and crocheting. That's because you can make something similar with tatting!

A tatted hero's quest begins.

By mainly using rows of chains and joining them together, you can make a doll very similar to a amigurumi doll.  I did use about twenty-one rings in making this, but for the most part this pattern used chains.


I based the doll off of the character Link from the Legend of Zelda: Ocarina of Time.
He stands about four and a half inches tall. The hair was made by cutting long picots and unraveling the thread, then trimming until the hair was the length I wanted. The eyes and tongue are rings made with only one double stitch for the former and three double stitches for the latter. All thread is size 10.
I'm quite pleased with how this turned out, and hope that my niece will like it when I give it to her for her birthday. She saw my first attempt at making a doll based off of this character and asked if I would make one for her too. I nodded my head, deciding that I would do my best to make her's awesome.

Unfortunately, I looked like one of Santa's helpers.
I think I succeeded in making my niece's birthday present look more like the character then my original attempt at a tatted doll. It took a lot of work, but I hope that they can go on some amazing adventures together.

Wednesday, February 27, 2013

Waste not, want not

So whenever I complete a project I try to save all extra thread, even if the length is in itself too miniscule to actually tat with. I tie all the odds and ends together and roll them into a ball. Then, when I want to just tat something without worrying about patterns or colors, I pick a color for my shuttle thread, tat a starting ring, then add in the ball of excess thread.
After this point, I either stick to a certain number of stitches, or just tat whatever looks right at the moment. Thus far, I have done two of these excess thread projects in size 10 thread.


The first ended up becoming a pencil holder.


Duckie felt a sudden craving for burritos
When flipped upside down, the sombrero becomes a flower

Size 10 thread, various colors

While the second became a sombrero for this rubber ducky!

So the next time you finish a project and see only a little bit of thread left on the shuttle, pause for a moment and think about what you might be able to use it for.

Tuesday, February 26, 2013

Lion hats

So a couple weeks ago some of my friends and I went out on a group date. The theme of the date was Disney. While the others made t-shirts, I decided to do hats based off of The Lion King.The first idea I had for the hats was to tat the ears.


 I liked the idea. Who else would have a hat with tatted ears? It would be a unique touch. Before figuring out the what else I would need to do to make the hats, I began tatting the ears.

After getting the hats, fleece in colors that would mostly match the color thread I had used for the ears and some frilly yarn for the Simba hat mane, I got to work putting it all together.
Now I'm not much of a sewer. I hadn't thought about how much sewing would be necessary to make these hats. I was focused on the tatting! But I was determined to make the hats. I did not want to decorate a t-shirt.
It took a few days without reading or working on other tatting projects, but I finished the hats before the day of the date.

Left: Simba's hat.                          Right: Nala's hat.

Despite some mistakes and mishaps, I'm happy with how they turned out. My date didn't seem too embarrassed by his hat, which was a plus.
I'd like to tat an entire hat, but that's a project I'm not quite ready to begin. So until then, I can at least add a unique touch to the hats I have through tatting.