Wednesday, December 25, 2013

The time has come for Christmas!

Merry Christmas!
I've got lots of tatting to share today!
Most of it was done in Lizbeth #121-Angel's Love, size 20.

Three friends, three snowflakes.

First was have the Two Colour Snowflake, by Anne Bruvold.  This was my first time doing this pattern, and it was quite fun,


I made each with a different secondary color, with the main color being green so that they were kind of like wreaths.


I really liked how these turned out. Though I'm not sure which is my favorite...


I'm glad that my friends liked them.

Three stars, three cousins.

For my three cousins, the Star Bright pattern by Be-stitched. This one was fun to tat, but not also had some moments of minor annoyance.

The next group of snowflakes came from the book Tatted Snowflakes, by Vida Sunderman.


Just give me a breeze, and I'll spin around!
The Whirlaway snowflake is one I've done before. It was still enjoyable tat though.

Where is my wheel? 

The Spoke snowflake was quite easy for me.

Pinwheel times two!

Two pinwheels for a couple of my aunts I don't see very often.

Just add glitter, and I will be perfect!

This Glittering snowflake was for my niece. She liked it.

I like trefoils a lot...

This Trefoil snowflake was for my friend who taught me how to tat. Because she is awesome.

I'm like a starfish!

I actually altered the Daisy snowflake slightly in order to make this. I left out a petal. But I thing this looks nice as a star. It's for my father.


My picots are nice and neat.

The Lacy snowflake was for my grandmother and grandpa. But I also had two pennies to give my grandmother, so...
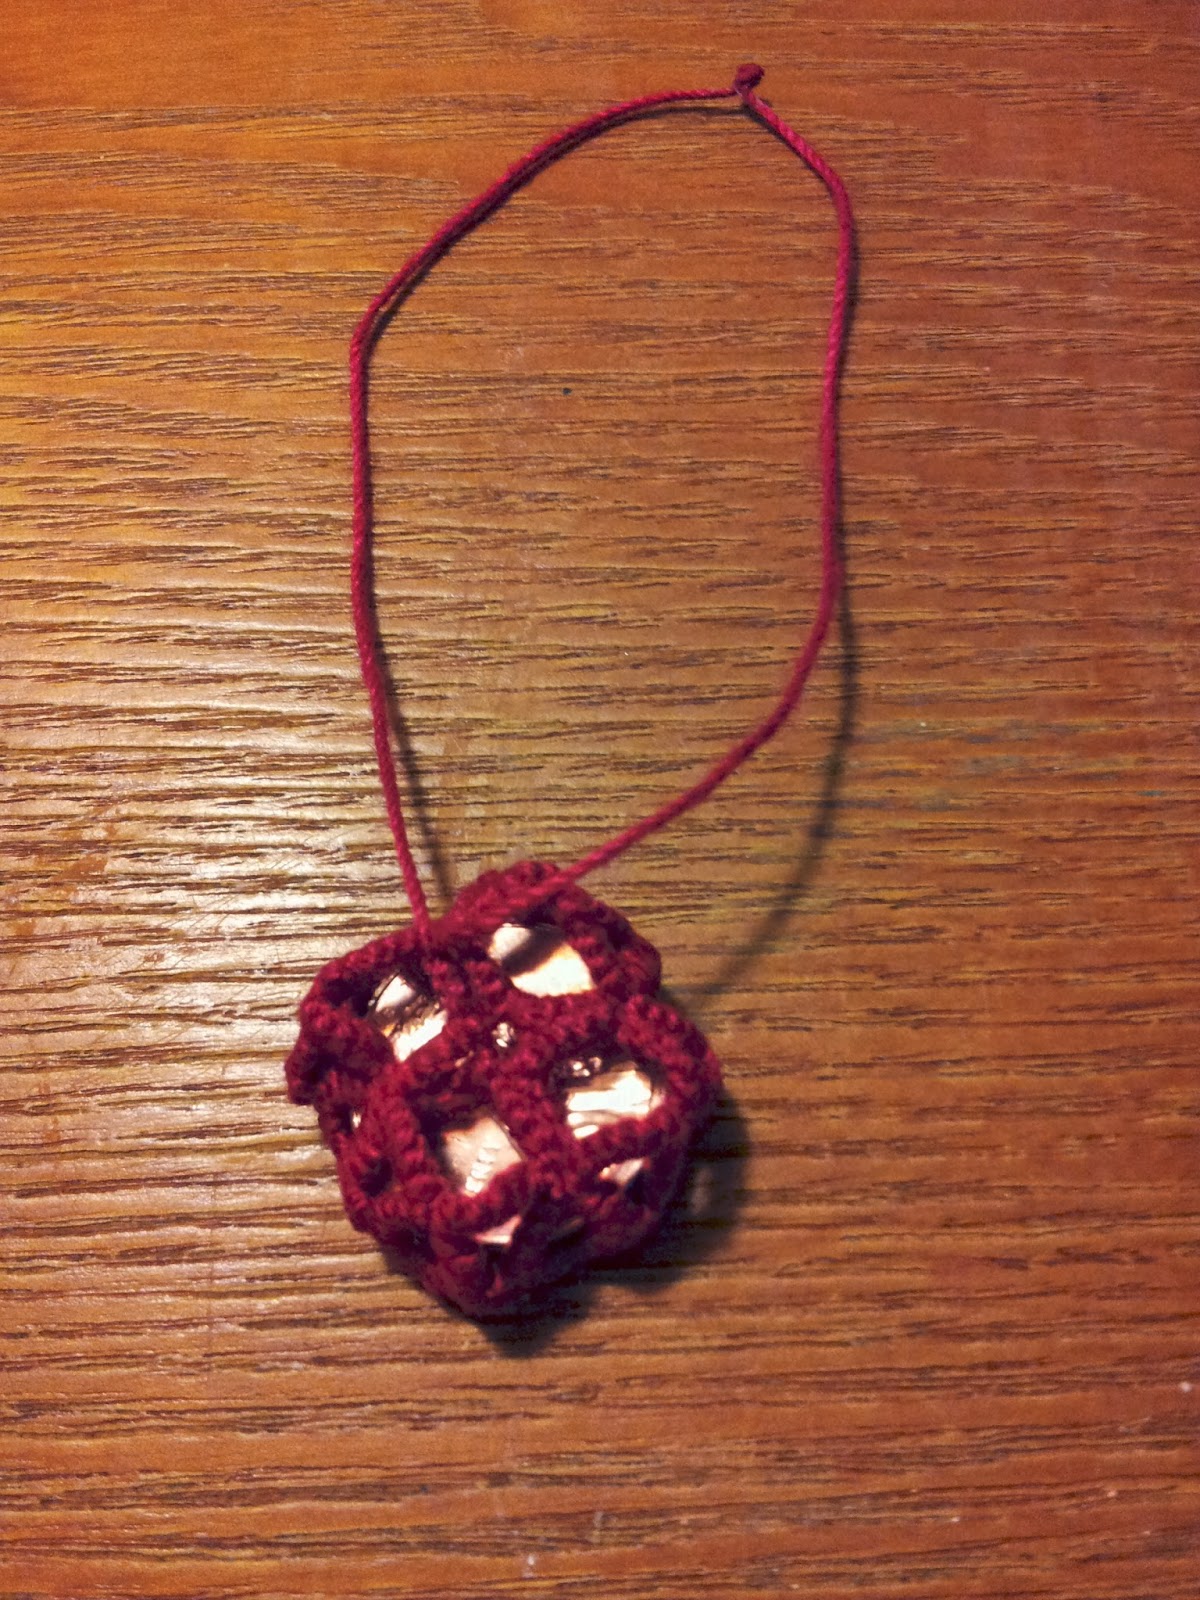
I'm original!

 ... I tatted them into a little box! That way, I could throw in my two cents. It made her happy, which makes me happy as well.
I made up the box pattern myself, using a little hat motif I made up a year or so ago as the base.


The next group came from the book Christmas Angels and Other Tatting Patterns, by Monica Hahn.

I'm good timber!

This Simple Christmas Tree pattern was for my bother-in-law. He's nice.

I heard the bells...

This Cloverleaf Bell was for my eldest sister. She's pretty cool.

I'm amazing.

I really like the Wheel of Nine Rings pattern. I've only done it twice, but it is one of my favorite patterns from this book. This was for my aunt.

I'm pretty cool too!

This was my first time making the Knobby snowflake, but it was really fun. This was for another aunt of mine.

I ♥ tatting.

The heart ring was for my mother. This was my first time tatting this pattern, and at times I found the large rings the make the hearts to be annoying to close.

If you fold me just right, I can form wings!

This one was actually a pattern for a butterfly. But I didn't really like how it looked folded as a butterfly, so I decided just to leave it flat. This is for my older sister!

This next one is a pattern I made up after failing to find a candy-cane pattern I liked.

Don't I look tasty?

It is simple, yet nice. This is for my other grandmother.

And last, but not least, we have these two snowflakes.

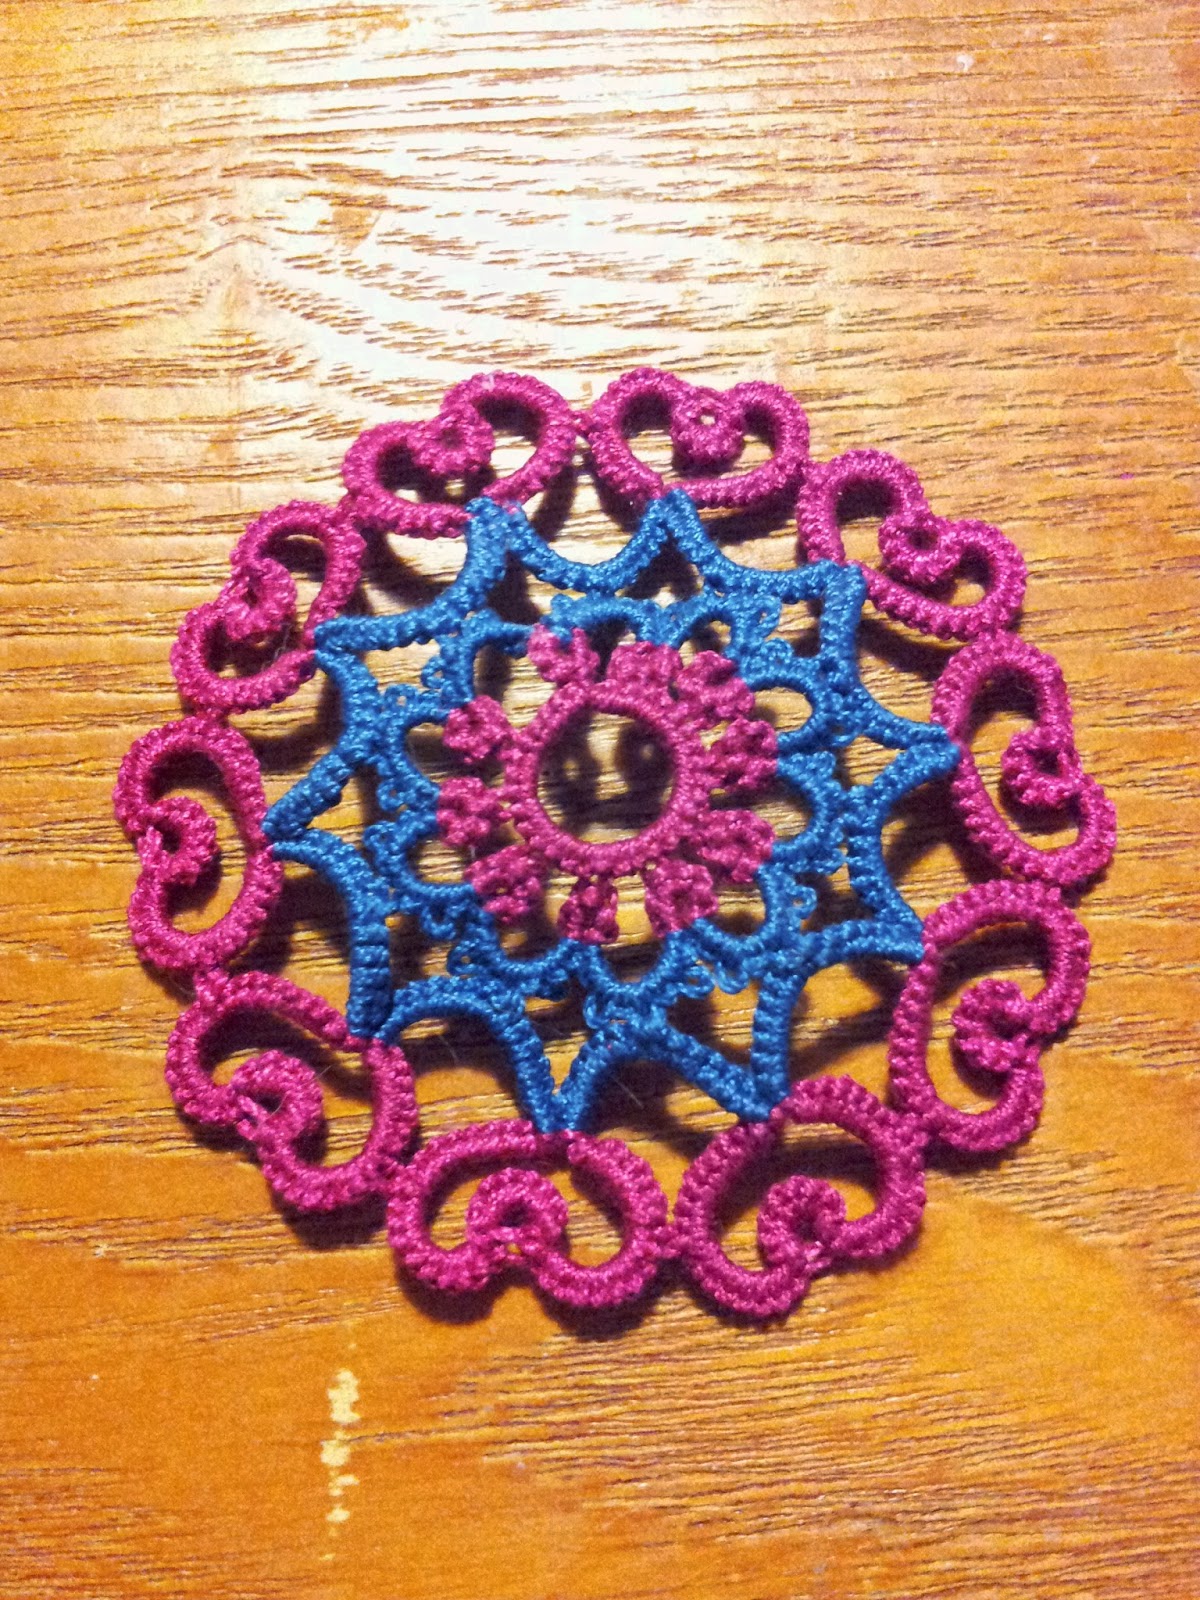
We are small, but still good.

The left one is from the Tatted Snowflakes book, while the right is a little altered version of the center of the Layered Tatted Snowflake pattern by Be-stitched.


It was a crazy run, but I enjoyed tatting all of these. Though next year, I'm not going to try not to wait until the last possible moment to start working on Christmas tatting.

Merry Christmas, I hope you have a wonderful day!

Friday, December 13, 2013

Have a blue, blue birthday

Well, this is the last birthday in my family that I've tatted something for this year.
And it is a very important birthday!
Today is my mom's birthday!
She requested a handkerchief for her birthday, so that's what I made.


Done in Lizbeth size 20, color number 130.


Her favorite color is blue, so I used a blue handkerchief. The pattern is from A Tatter's Workbook by A. Tatter. It was a fun pattern to tat, and I found it interesting to use a handkerchief that already had holes that I could join the edging to.


My mom liked the handkerchief, for which I am glad.
I would consider using this brand of handkerchief again. Though this one was smaller then the white handkerchiefs I've used before, this handkerchief came with a flower design on one corner of it and the had the nifty holes along its edge that allowed for easy connecting and spacing.

Tuesday, November 19, 2013

I Am Dreamcatcher Four

Now this dreamcatcher is really cool.

Done in size 20 Lizbeth. Colors 656 (Wedgewood Dk) and 657 (Ocean Turquoise Dk).

Now you might be wondering why I think this one is cool. Well, that's because it is the first piece of tatting I've made that gets to call the state of New York home!
It was made for a friend of the family, as something for him to give his wife for Christmas.

Lots of chains were tatted in this pattern. And look, split chains! That are not extremely noticeable!


The pattern for the main body is a slightly edited version of the Basket of Clover pattern from Janet Carroll's book Elegant Tatting Patterns. The last two rows of the pattern were omitted, while the sixth row was repeated once. The reasoning for this was so that the doily pattern would fit within the seven inch dreamcatcher hoop; as the full pattern would have been too large.
The bit of tatting to hang the dreamcatcher by was based off of the cloverleaf in the second row (near the center of the main body, it is the three rings connected to each other).

Chicken feathers again. From three different hens.


The hanging motif was also based off of the cloverleaf used in the pattern.
I did four split chains in this motif! I'm excited about that because before this project I did not really know how to successfully tat a split chain. It was a weird technique I couldn't quite grasp. But not anymore! I have finally figured out the split chain!

Now that I've abused the exclamation point a bit, let get to the reason why I'm posting this now, instead of waiting until after Christmas. When the package containing this dreamcatcher arrived to the family friend, his wife was wearing a shirt with similar colors to the thread I had tatted this with. So he decided to give it to her as an early present.
Suffice it to say, they both liked the dreamcatcher.
Which was something that I was very happy to hear.

Wednesday, November 6, 2013

Could someone pass me a birthday?

Happy birthday to my cousin!
As you might have figured out, most of the projects I complete are birthday gifts. Today we have a lovely handkerchief edging out of The Tatter's Treasure Chest by Mary Carolyn Waldrep. The pattern is number 8132, which is a cool number name.

That isn't marble, but tissue paper. Done in size 20 Lizbeth #142.


I consider handkerchiefs to be a good present for guys. It allows me to give them something dainty without wounding their masculinity too much. I wouldn't want to give one of my guy cousins a doily and have him think: "Gee, thanks. What am I suppose to do with this frilly thing?"
So I try to keep the decorative picots small whenever I make something for a guy.

But whenever a pattern has three picots right next to each other, I can't resist making the middle one the tallest.


I really like a cloverleaf edging for guys. It allows for some cuteness without being overwhelmingly frilly or intricate. I like having both rings and chains. It makes the edging much more interesting.


For any tatters out there, what are your opinions when it comes to tatting something for a guy?

Friday, November 1, 2013

Let me mark that birthday for you

Well, here is another birthday!

Look, size 80! It is such a nice, thin thread size. I really like it for bookmarks and dainty things. 


This lovely bookmark is from the book Christmas Angels and Other Tatting Patterns by Monica Hahn. The pattern is called the Filigree bookmark. It was done in size 80 Christmas Green Lizbeth thread.

The top has a fancy cloverleaf appearance.

Now, I might have just been reading the pattern incorrectly, but it seemed like the written pattern wasn't quiet the same as the picture of the pattern. I followed the written pattern up until the end, where I decided to leave off the fancy point that is at the top of the bookmark and just leave the bottom flat.

While the bottom is nice and flat. Well, except for the slight curve. Just call it a creative flair.


Now, some people I know have suggested that I stiffen the bookmarks I make. But I kind of like them fresh off the shuttle. If the book I'm reading is shorter then the bookmark, I don't have to worry about the stiff bookmark catching on something and flying out of my book!
But that is just my opinion. If I really wanted to read a book that was shorter then my bookmark, I'll just use something else to mark my place.

Anyway, my sister really liked the bookmark. She commented that I'm getting better with my tatting.
It is as the saying goes:
"Practice makes perfect."

Friday, October 4, 2013

No! Don't set your drink there!

Crocheting strikes again!

The ring of moisture shall consume all!

This was an experiment in keeping my rows equal. Then it became practice for a new (to me) crocheting technique, which I do not know the proper name of.
Crocheting is confusing. And annoyingly difficult.
But it gives me something to do when my fingers grow tired of whatever tatting project they've been doing.
So here is a little crocheted coaster, gently used.

Thursday, October 3, 2013

Belated birthday post

Well, at least this is only belated in posting, not in actually giving it the person.
This was meant to be posted way back in July, but I kept forgetting about it.
But no more!
Behold, the combined powers of crocheting and tatting!


It reminds me of the ocean. If the ocean was a cute little basket. And not, you know, wet.


I know. The tatting is just a simple edging along the top of the basket. But that crocheting was made by me! Without the use of a pattern! I was pretty excited about this.

Look! You can see through it! A little bit...


I might not like crocheting as much as tatting, but it does have its moments.

Look into the depths of the yarn. What do you see?


My tension with crocheting has been described as "really tight." But I think this turned out pretty well.

I could be a jellyfish, if my tatting was longer...


Through it may have been delayed, here is the crocheted basket with a tatted edging.

The path through a book is long. Remember to bring a friend.

And to finish this post off, here is the other part of her present. A tatted bookmark!
You didn't think that crocheting was going to be the star of this post, did you?

Wednesday, October 2, 2013

Well, it's been a hoot

Autumn is here. The time has come for leaves to change color and fall from their trees.
As they do, you might catch a glimpse of something hiding in on the branch.

Done in size 20 Lizbeth thread: Mocha Brown Med., Falling Leaves, and Ecru.


This little tatting doodle was for a card. The cute owl is a pattern from the book Tatting Collage by Lindsay Rogers. The branch and berries a quick little addition.
I enjoyed making this, and am eager to try some more patterns from that book.
With a few major holidays on the horizon, I'll be tatting a lot.
I just need to remember to actually post the pictures I take!
Silly procrastination, you've overstayed your welcome once again.
Oh, and not only will there be posts about tatting in the future, but that horrid (to me at least) craft known as crocheting.

You have been warned!

Tuesday, September 17, 2013

Dreamcatcher III: The Search for Thread

Well, its time for another birthday!
Today was my Aunt's birthday. To help her celebrate, I made a dreamcatcher.

Done in size #20 Lizbeth thread, Tropical Punch.

The base for the center is the Occasional Doily pattern from the book Tatting Doilies & Edgings, edited by Rita Weiss. I then added three rows to make it fit within the ring.

I thought that my aunt would like this pattern because it looks like flowers.


This was my first time tatting this pattern. I quite enjoyed it, and will likely tat part of it again if i ever need to make flowers.

No peacocks were harmed in the gathering of these down feathers.


I tatted an extra flower from the doily pattern to the the hanging motif. I like how the bead is connected the the motif. I decided to use two peacock feathers I had instead of chickens feathers for this dreamcatcher because the fluffiness of them reminded me of this aunt. These feathers are extremely soft.

When I gave the dreamcatcher to my aunt, she was very happy. I'm really glad that she liked it.

Thursday, August 29, 2013

Can you pass me another birthday?

Today is my cousin's birthday! To help him celebrate, I tatted him a soda can cozy.

Split rings! Done in size 10.

It fits snugly onto a normal size soda can, and should help to keep the drink cold.


I did it in a dark red and dark blue, so that any spills shouldn't be as noticeable.


Depending on which way he put's it on, it can appear more red then blue when looking from an angle, or the opposite.
Done in all split rings, except for the first and last ring, which are normal rings.
Each ring is 3-3-3-3 or 3-3/3-3, with joins thrown in where appropriate.

Tuesday, August 27, 2013

A birthday is not something you sneeze on

Today is my uncle's birthday, so I tatted a handkerchief edging for him.


He's a Denver Broncos fan, so I tried to use thread that matched the team's colors. The thread is about size 20.


The pattern is edging number 8822 from the book The Tatter's Treasure Chest, edited by Mary Carolyn Waldrep.
This was tatted using my new Starlit Shuttle, whom I have given the name Narwhal.

Narwhal is quite sparkly.


Narwhal is larger then the Clover shuttles I normally use, which came in handy while tatting the edging; as that meant I could hold more thread at one time. The larger size did throw me off a little at first, but overall the Starlit shuttle seems to work alright.

Tuesday, August 6, 2013

Progress report

I haven't posted in over a month, so I thought it might be a good idea to show you some of the projects I'm currently working on.

Crocheting! How dare it be so difficult?


First off, a large chunk of my tatting time has been taken by crocheting. In April, I asked my sister to teach me how to crochet. She agreed, so now I know some basics.
But it is so frustrating! I'm not very good at making the stitches loose, since my fingers tend to hold the yarn as if I were tatting. With more practice, I'm sure that I'll be able to make a loose, fancy piece of crocheting.
The above picture is a little hat I crocheted.

Ah, split rings, how I enjoy making you. Winifred and Sunny the shuttles say hello.


Now tatting is so much easier for me then crocheting. My favorite technique would have to be split rings, which is what this project is going to be made mainly of! Using leftover thread from other projects, I'm making a little tatted box to hold a couple rings in. Leaning against Sunny the shuttle is the completed lid of the box, while below is one of the unfinished pieces. The box will have five pieces like that unfinished one: each being made of six rows of six rings, the rings themselves being a pattern of 3-3-3-3 (the 3's being the number of double stitches and the - being a picot, though after the first row some picots will become joins).

Carl and Pandora the shuttles have been hard at work. 925 rings to be exact.


Here is something I've been working on for a while. This is the first half of a tatted bag I'm making. As the tape measure shows, it will be just a little over fifteen inches wide. Each row has sixty rings (3-3-3-3), and I'm on row sixteen. The current plan is to have sixty rows. After it is done, I will tat an identical piece and connect them with a tatted insert also made of split rings. Its a good thing I like split rings, right?

Here is a hint at what has been eating a majority of my tatting time.


Now for this last picture, I'm not going to show you the entire project. Because it is not even close to done! This thing is ridiculously large for my meager crocheting experience, but I'm determined to finished it. This picture does show you how tight my crocheting is though. When I finish the crocheting, I plan on tatting an edging to complete this project.

Well, that's the end of this progress report! I hope all of your works in progress are going well!