Wednesday, March 19, 2014

Charming motifs

Today I have two pieces to show you.

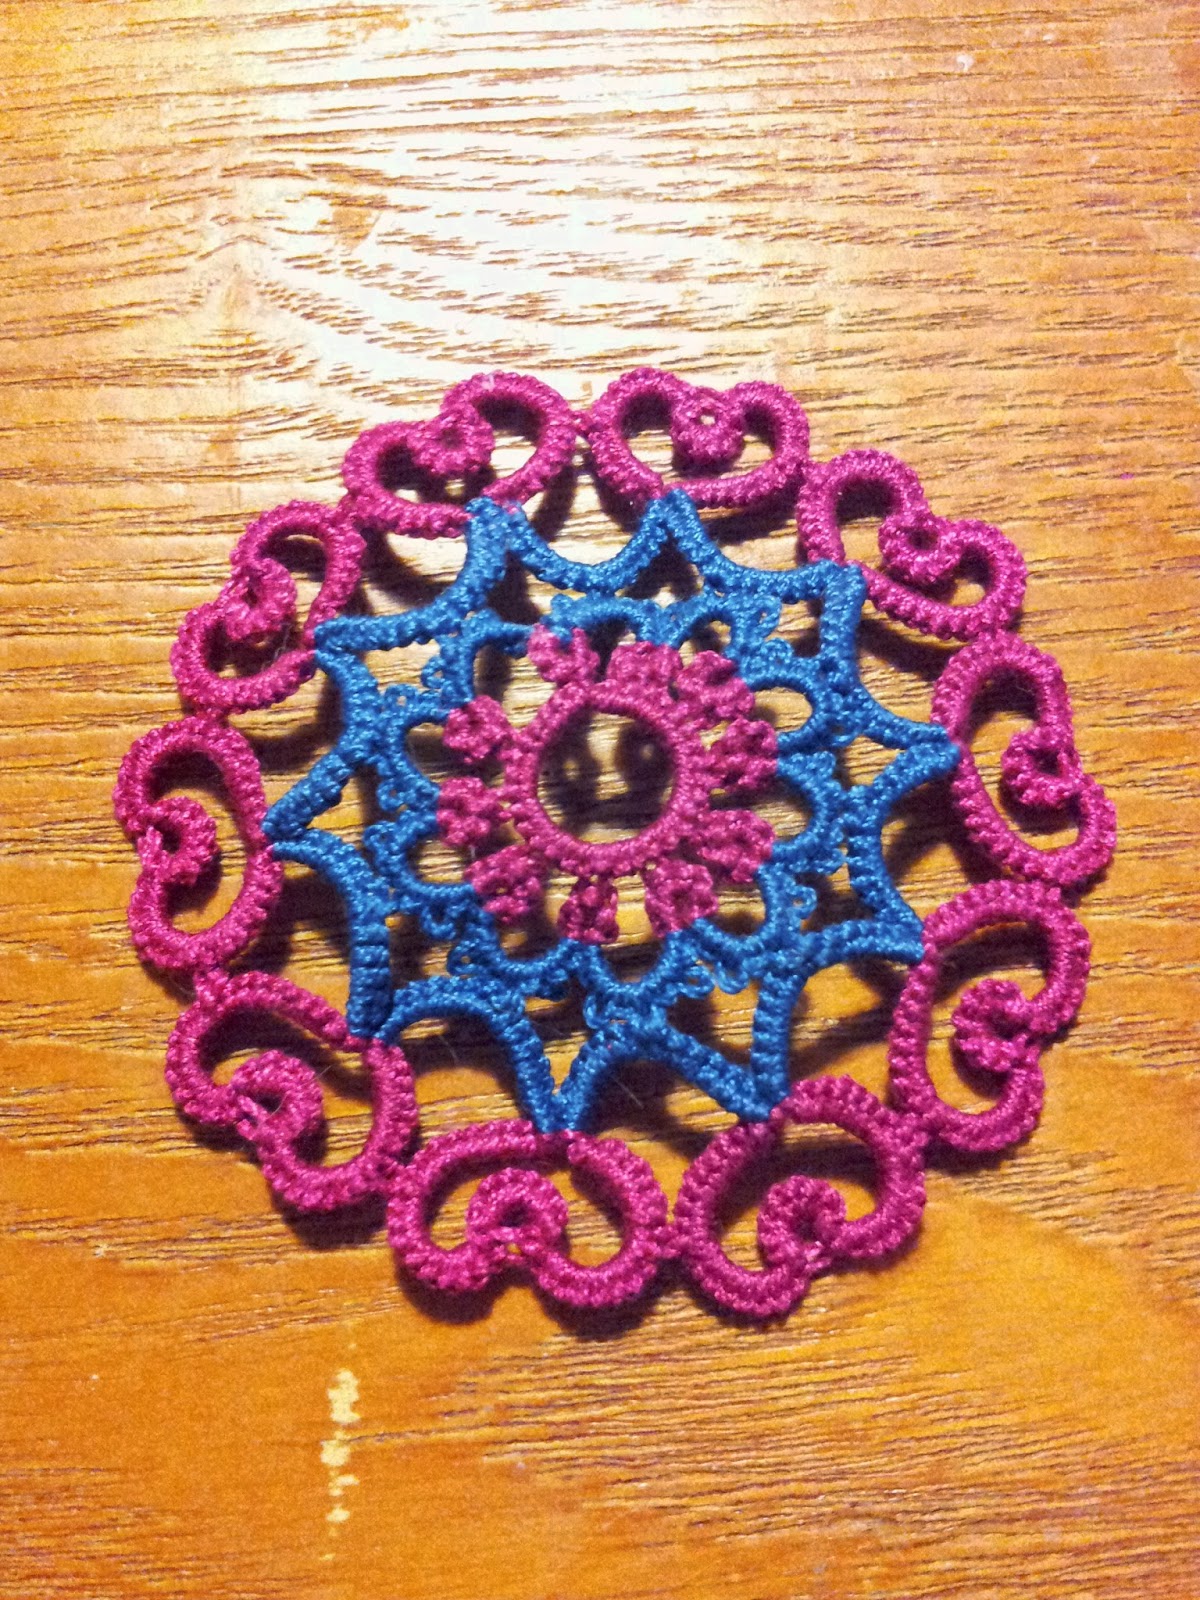
Done in size 10. Motif #3. Done in a light blue and a mint green.

This pattern is from Tatting Patterns, by Julia E. Sanders. Called figure 13, this trimming was interesting to tat because the picture was not on the same page as the pattern. I like these two colors together, and the pattern was fun. In the picture, it looked like most of the chains were facing the same way, so that's what I tried to do.
Weaving in the ends was interesting. I'm slowly figuring out what works best for me with hiding the ends.

Done in size 20, size 80, and sewing thread. Motif #4.

This is one of those uncommon pieces that I set out to make for myself. It started off when I decided to tat Marilee Rockley's Compass Pendant (bottom center, done in Lizbeth size 20, #684 and #694), from her Tatted Jewelry book. After I made it, I thought to myself, what would you like to do with this? How about a charm bracelet!
So I grabbed some thread, and tatted a doodle that looks a little like an anchor (top right, done in Lizbeth size 20, #647).
After that, I decided that the bracelet needed a hat. Because I love hats. I haven't posted very many of them, but usually when I pick up a shuttle and begin tatting without a particular pattern in mind, I end up making either butterflies or hats. (Bottom right, done in Lizbeth size 20, #115).
Then, because I like video games, I decided to tat a pokeball and the Triforce (from Pokemon and the Legend of Zelda, respectively). For the Triforce, I used a cloverleaf from a motif in The Complete Book of Tatting, by Rebecca Jones. The pokeball was another doodle I made up. (Triforce: bottom left, done in gold sewing thread. Pokeball: left, done in Lizbeth size 80, #671 and #601).
The last charm is a key. Because I collect keys, and think that keys are cool. I just made it up as I went. The blade of the key ended up looking kind of like a R, which is kind of neat. (Right, done in Lizbeth size 20, #691).
I weaved in the ends with each charm, which was interesting. I had to change to a smaller needle for the pokeball and Triforce.
The chain that the charms are on was from my jewelry making supplies, along with the clasp. So it is just the right fit for my wrist!

Wednesday, March 5, 2014

The dragon and the roses

I meant to post these half a week ago, after my niece's birthday.
I suppose this does count as after, so let's get to the hair clips!

Done in size 10, in my niece's favorite colors.

These were a surprising amount of work. The pattern is Tatted Rose, by Linda S Davies.
Now, the main reason that these were on the more difficult side for me is that I decided to sew the petals together instead of gluing them. I thought that since they were going to an energetic little girl, the sturdier they were, the better.
Besides, it meant that I had to practice my sewing ability (which although not horrible, is incredibly slow and tiresome).
My niece seemed to like them, so that's what counts.


Another thing I've been meaning to post is motif number two for the the 25 Motif Challenge!

I am the jade dragon! Motif #2, done in size 10.


Now this fellow was interesting. The Chinese Dragon by Anne Bruvold is another pattern that I've had sitting in a file for quite some time. I'm not sure that I'll be tatting this particular pattern again for at least a few months; since I found it to be strangely monotonous. But I am pleased to have finished it, and enjoyed the self closing mock rings in the pattern.
This dragon was also my first attempt at hiding the ends by weaving them through the stitches. It took some time, but I like how the tatting looks without an obvious knot marking where I ended.
I think I'll continue hiding the ends using this method, despite the time it takes.
I'm going to try and have each motif for the challenge be something I haven't tatted before. It is an extra little challenge, but I think it will add to the fun!

Monday, February 17, 2014

Lovely gifts

Well, I have a bunch of pieces to show you today.
The first is a bookmark I made for my friend's birthday.

Done in Lizbeth size 20, #657 and #603.

The pattern is an edging from A Tatter's Workbook by A. Tatter. I added two extra chains for the top and bottom, repeated the edging to make the second side, and joined the small chains in the center to hold it all together.
My friend liked it.

Next are some Valentine's day gifts that I tatted.

Done in size 10. My adorableness is unbearable!

This cute bear came from the book Tatted Animals by Inga Madsen. It was fun because it was my first real attempt at a diagram only pattern. I'm eager to tat some of the other critters from this book!

Done in size 10. Haven't you heard of a purple dolphin?

I've been meaning to tat Jane Eborall's Dolphin for for my sister ever since I first came across it. But the pattern ended up sitting in a folder for a couple of years.
But that ended up being a bit of a good thing, since this pattern had a technique in it that I wouldn't have really known how to do a couple of years ago.
Namely, split chains.
Now, I love split rings. Love them. But until very recently, split chains were terrifying.
I don't quite know why, but they were.
But I was determined to do the two split chains in this pattern.
And I did!
Another thing I learned from this pattern was down picots. What are down picots? A picot that faces down! They are really easy to do, and pretty cool. I like down picots.

Done in size 10. That's quite a hearty red, isn't it?


My tension was a bit off with this heart. The pattern is Heart Frame, from Tatting Hearts by Teri Dusenbury. I don't really have much to say about this piece, other then it was the only heart I tatted for Valentine's day.

Done in size 10. Don't we look cute?

If these look familiar, that's because they are. When I was tatting the bear from Tatted Animals, part of the belly piece looked a lot like a flower. So I decided to tat some as flowers. I like the overlapping picots.

Done in size 10. Still a little rough around the feathers...

This is a griffin. A tatted griffin. I looked all around the internet for a griffin tatting pattern, but couldn't fine one.
So, I decided to try and make one.
It took a few revisions, but I've gotten most of the kinks worked out. The hindquarter is almost entirely made of split rings, while the forequarter is a combination of rings, chains, split chains, split rings, and one thrown ring. With some josephine knots and down picots thrown in for fun.
It was a lot of fun coming up with my own pattern, though there are a few things that still need some tweaking.

As I was working on the griffin, I decided that I want to participate in the 25 Motif Challenge. This means that I'll be trying to tat twenty-five motifs within a year. Am I up to the challenge? I'm going to try!
So to start off the challenge, this griffin will be my first motif!

25 Motif Challenge status: 1/25.

Wednesday, February 5, 2014

Two birthdays

Just a little while back, two people in my family had their birthdays!
I thought  I would share what I made for them with you.

The first birthday was my grandfather's. For him, I tatted the Whip Cream Frill doily from Tatting Doilies & Edgings by Rita Weiss.

Done in Lizbeth size 20, #134 Mountain Breeze.

He really liked it. This was a fun pattern to tat, though the center turned out a little more squished then I meant for it to.

The next birthday was for a cousin. I tatted her a Spiral Bookmark by Gina.

Done in Lizbeth size 20, #633 Purple - Dk and #640 Antique Violet Med.


This bookmark is really easy to make, and quite fun as well. I like these two purples together.
I think my cousin liked this bookmark.

I've noticed recently that I tend to make fairly small picots, even when it is supposed to be a large picot. This is something I think I'll try working on with my next projects.
Speaking of upcoming projects, I recently worked with a pattern that called for self closing mock rings (SCMR). I'd never really looked into that particular technique before, but found as I tatted the five SCMRs that the pattern called for that I actually quite like making them. So I'll be on the lookout for any other patterns that use this technique.
Oh, and in case you are wondering, I'll be posting the results of that pattern around March first.

So until next time, good luck with your own projects!

Wednesday, January 8, 2014

Float among the clouds

Well, I've finished another excess thread project.
This one is pretty cool, and used up most of my excess size ten thread.

See that basket? It was going to be a ring box.

The balloon was made with a single ring and a bunch of chains. I stuffed it with some stuffing so that it would maintain its shape.

The seam color of the balloon changes five times. It was also excess thread. 

I used some clear plastic cord to connect the basket to the balloon. That way from a distance the basket would appear to be floating under the balloon.

The balloon is really soft and fun to squeeze.
The order of the thread color is based on when I tied it to my excess thread ball. The thread at the bottom of the balloon is younger then that at the top, while the thread used on the basket is the youngest.
What's really neat is how the hot air balloon's shadow really does look like a hot air balloon.

Well, I hope you enjoyed this post. Good luck on your own projects!

Wednesday, December 25, 2013

The time has come for Christmas!

Merry Christmas!
I've got lots of tatting to share today!
Most of it was done in Lizbeth #121-Angel's Love, size 20.

Three friends, three snowflakes.

First was have the Two Colour Snowflake, by Anne Bruvold.  This was my first time doing this pattern, and it was quite fun,


I made each with a different secondary color, with the main color being green so that they were kind of like wreaths.


I really liked how these turned out. Though I'm not sure which is my favorite...


I'm glad that my friends liked them.

Three stars, three cousins.

For my three cousins, the Star Bright pattern by Be-stitched. This one was fun to tat, but not also had some moments of minor annoyance.

The next group of snowflakes came from the book Tatted Snowflakes, by Vida Sunderman.


Just give me a breeze, and I'll spin around!
The Whirlaway snowflake is one I've done before. It was still enjoyable tat though.

Where is my wheel? 

The Spoke snowflake was quite easy for me.

Pinwheel times two!

Two pinwheels for a couple of my aunts I don't see very often.

Just add glitter, and I will be perfect!

This Glittering snowflake was for my niece. She liked it.

I like trefoils a lot...

This Trefoil snowflake was for my friend who taught me how to tat. Because she is awesome.

I'm like a starfish!

I actually altered the Daisy snowflake slightly in order to make this. I left out a petal. But I thing this looks nice as a star. It's for my father.


My picots are nice and neat.

The Lacy snowflake was for my grandmother and grandpa. But I also had two pennies to give my grandmother, so...

I'm original!

 ... I tatted them into a little box! That way, I could throw in my two cents. It made her happy, which makes me happy as well.
I made up the box pattern myself, using a little hat motif I made up a year or so ago as the base.


The next group came from the book Christmas Angels and Other Tatting Patterns, by Monica Hahn.

I'm good timber!

This Simple Christmas Tree pattern was for my bother-in-law. He's nice.

I heard the bells...

This Cloverleaf Bell was for my eldest sister. She's pretty cool.

I'm amazing.

I really like the Wheel of Nine Rings pattern. I've only done it twice, but it is one of my favorite patterns from this book. This was for my aunt.

I'm pretty cool too!

This was my first time making the Knobby snowflake, but it was really fun. This was for another aunt of mine.

I ♥ tatting.

The heart ring was for my mother. This was my first time tatting this pattern, and at times I found the large rings the make the hearts to be annoying to close.

If you fold me just right, I can form wings!

This one was actually a pattern for a butterfly. But I didn't really like how it looked folded as a butterfly, so I decided just to leave it flat. This is for my older sister!

This next one is a pattern I made up after failing to find a candy-cane pattern I liked.

Don't I look tasty?

It is simple, yet nice. This is for my other grandmother.

And last, but not least, we have these two snowflakes.

We are small, but still good.

The left one is from the Tatted Snowflakes book, while the right is a little altered version of the center of the Layered Tatted Snowflake pattern by Be-stitched.


It was a crazy run, but I enjoyed tatting all of these. Though next year, I'm not going to try not to wait until the last possible moment to start working on Christmas tatting.

Merry Christmas, I hope you have a wonderful day!

Friday, December 13, 2013

Have a blue, blue birthday

Well, this is the last birthday in my family that I've tatted something for this year.
And it is a very important birthday!
Today is my mom's birthday!
She requested a handkerchief for her birthday, so that's what I made.


Done in Lizbeth size 20, color number 130.


Her favorite color is blue, so I used a blue handkerchief. The pattern is from A Tatter's Workbook by A. Tatter. It was a fun pattern to tat, and I found it interesting to use a handkerchief that already had holes that I could join the edging to.


My mom liked the handkerchief, for which I am glad.
I would consider using this brand of handkerchief again. Though this one was smaller then the white handkerchiefs I've used before, this handkerchief came with a flower design on one corner of it and the had the nifty holes along its edge that allowed for easy connecting and spacing.