Tuesday, March 19, 2013

A new dragon takes flight

At least, it would if I hadn't sewn it onto the case for my nook.

Help, I'm trapped in this position!


I just got a replacement cover for my Nook Color, but happened to get one the exact same color and style as one of my friends. So in order to tell them apart without having to look at the Nook, I decided to tat something to put on my cover.
I thought that one of Anne Bruvold's Minor Norwegian Dragons would look really cool on the cover, so I decided to tat that. I used some size 20 DMC thread, but unfortunately I can't tell you the exact color.
I really enjoy this particular pattern, though this was only the second dragon I have tatted. Expect to see some more dragons at some future date.

Monday, March 18, 2013

While at the dentist

I went to the dentist today. While I was in the waiting area, I was able to complete a tatting project.

Being numbed by the dentist does not mean that you can't tat.


This little coin purse is a birthday present for a cousin. I love making things out of tatting for my relatives birthdays, and thus far they seem to like what I've made. Making something for someone else is a wonderful way to show them you care.  Even if it isn't their birthday, you can still surprise them with a little handmade gift.

Don't be afraid to test the gift first. It's better to test it and fix any flaws before you give it away.    


So next time you have a dentist or doctor's appointment, why not try taking a craft with you to work on?

Wednesday, March 13, 2013

My start in tatting


My first bit of tatting: learning chains and rings.

My tatting skills were not very good. My tension was inconsistent, I left large gaps between rings, and I thought I could join rings together by tying them all together with the end of the thread! This is a horrible, embarrassing piece of work.
But it also showed that I was getting better. The blue bit with the two white rings is where I began, and it is ugly. Irregular tension, twisted lengths of thread that I did not mean to be picots, and messed up double stitches.
Then there is the green length of rings. Twisted and only partially closed, with spacious gaps that serve little purpose. But the green length of chain showed some improvement in tension consistency and only a little bit of twisting.
That little mess of blue rings was horrendous. It was followed by an attempt to add in more thread. But while the blue and pink double stitches were cool in coloration, they were awkward to tat.
The lone green ring was still a little twisted, but it was better then my previous rings.
The pink length of chain was mostly consistent in tension, and purposely twisted, though the picots were irregularly spaced and inconsistent in size.
Then came the mess of green rings. Loose and full of picots, I joined them together by running a long piece of thread through the base of some rings and the picots of others.

It is hideous and full of mistakes, but that's not the point. This was the work of a beginner, of someone who was uncomfortable holding a shuttle. It is not a fine bit of lace done in size 80, but a shy attempt at learning a craft with size 10 crochet thread.
It was the hesitant first steps of one who thought she couldn't do crafts.
It is a reminder that beginnings are not often pretty. But they can grow into fantastic adventures.
So don't give up at the beginning. And don't throw your beginnings into a fire.

Friday, March 8, 2013

Trying size 80

I normally tat using size 10 crochet thread, as that is what I can easily find in my area. I have a fair collection of Lizbeth size 20 that I like to use for special projects, but until December I hadn't been able to get any size 80 thread.
For those who may be wondering when I talk about thread size, the higher the number is, the smaller the thread. Size 80 is one of the traditional thread sizes when it comes to tatting and makes the finished piece look daintier.
 Anyway, I tatted using size 80 thread for the first time a few days ago.

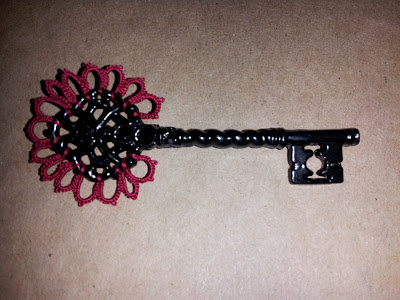
Lizbeth size 80: Victorian Red


It was just a simple pattern of chains joined to a key broach, but I quite enjoyed the experience. Size 80 is much finer then the size ten I normally use, but it was really fun to tat with. I'm eager to think of another pattern that I can tat with size 80.
Don't be afraid to try something new!

Tuesday, March 5, 2013

Tatted amigurumi

What is amigurumi?
Well, it is Japanese for "knitted or crocheted stuffed doll." Wikipedia has an article about it that talks about the technique and purpose, so if you're interested in making something like this, feel free to study up on it. Now, you may be wondering why I began this post with talk of a art that is made through knitting and crocheting. That's because you can make something similar with tatting!

A tatted hero's quest begins.

By mainly using rows of chains and joining them together, you can make a doll very similar to a amigurumi doll.  I did use about twenty-one rings in making this, but for the most part this pattern used chains.


I based the doll off of the character Link from the Legend of Zelda: Ocarina of Time.
He stands about four and a half inches tall. The hair was made by cutting long picots and unraveling the thread, then trimming until the hair was the length I wanted. The eyes and tongue are rings made with only one double stitch for the former and three double stitches for the latter. All thread is size 10.
I'm quite pleased with how this turned out, and hope that my niece will like it when I give it to her for her birthday. She saw my first attempt at making a doll based off of this character and asked if I would make one for her too. I nodded my head, deciding that I would do my best to make her's awesome.

Unfortunately, I looked like one of Santa's helpers.
I think I succeeded in making my niece's birthday present look more like the character then my original attempt at a tatted doll. It took a lot of work, but I hope that they can go on some amazing adventures together.